Soon after I started testing the Mk7 head it stopped moving plastic, period. I had a working Mk6 handy and a Mini MakerFaire to attend, so I fell back to the Mk6 and decided to let other people debug the Mk7.
However, nobody on the MakerBot list really had a reason or a fix I liked, so I took it apart to fix on my own.
The first thing I discovered was that the pressure mechanism for pushing the plastic against the stepstruder was not pushing hard enough, due in part to scratches on the head’s surface.
The second — and more important — thing was that the stepstruder gear was filled with shreds of plastic. It came off easily, so like the Mk6, just pushing the plastic harder would clear the junk out of the motor.
But how to do that?
Like this.
It’s really that simple. Grab a spare M4 bolt from your parts kit, buy a wingnut at the local hardware store and glue/Loctite the wingnut to the end of the bolt.
I set it up, dialed in a temp of 240C (see earlier posts about temperature), and it forced plastic through with no problem at all. Even a 5 minute run ran without any problems at all.
Now to print some test models….
I had the Mk.7 on the “needs help” bench while doing the previous set of temp tests. I took it apart and discovered the problem with it not pushing plastic was the tensioner against the drive. It had scratches and the drive pulley was clogged with plastic. After fixing that — see the next post for my cheap and adjustable tensioner — I put it on the Cupcake and did another set of temperature tests.
Like the previous set of tests, for temperature reads I used:
- built-in sensor that ReplicatorG software reads
- Fluke 88V temp sensor with temperature probe. Not a cheap device but the readout is 0.1C and it’s fast
- $20 BBQ grill cooking thermometer. Cheap, easy to use, but I think their goal is to make sure I don’t kill someone with undercooked poultry.
As with the Mk.6, the temperatures are lower on Replicator than on the other two sensors, so I need to run with much hotter temps than are required by the instructions. At this point I’m considering adding an offset/calibration value in the software so that the read temp is adjusted properly.
(The images are hosted on flickr for easier commentary)
Mk.7 with software 0033
Part of switching over to Gen 4 was improving daily operation by locking down the extruder and the build environment. Going to the Mk.6 Stepstruder was already in progress but I really needed to ditch the difficult-to-use but trendy Automatic Build Platform for the Heated Build Platform (HBP). It was great for making kid’s favors at a Maker Faire but a real PITA for complex or experimental objects.
After some decent experiments with the Mk.7 (more on that later), I decided to try the 0.3mm head and 1.8mm plastic on the Mk.6 after the success with the 0.4mm head and 3mm ABS.
It works, but not well enough to actually print. The drop from 3mm to 1.8mm plastic, almost %50, should have worked well with the drop from 0.4 to 0.3 but the extruder doesn’t want to extrude. There was some talk on the makerbot list that black 1.8mm plastic required higher temps, those were red-lined by the software, so I did some measuring on my own.
Back in the early days, getting your print temperature correct was one step from ritual magic. That seemed likely, so I decided to repeat some early tests and wire up second and third sensors to run in parallel with the default sensors.
With these, I collected some data and made some graphs. The sensor tips were put as close to the MakerBot sensors as possible and I waited as long as seemed reasonable for the temperature adjustments to stabilize after a change.
- built-in sensor that ReplicatorG software reads
- Fluke 88V temp sensor with temperature probe. Not a cheap device but the readout is 0.1C and it’s fast
- $20 BBQ grill cooking thermometer. Cheap, easy to use, but I think their goal is to make sure I don’t kill someone with undercooked poultry.
The short answer is this — the replicator is reading at least 10C lower than anything else, so I need to run with much hotter temps than are required by the instructions.
(The images are hosted on flickr for easier commentary)
Mk.6 tests:
Mk.6 with software 0033 (recent tree build)
Mk.6 with software 0029 (distributed)
HBP tests:
HBP with software 0033
HBP with software 0029
Well, it’s working, and quite nicely. I don’t have the print range of a TOM, but I have quality, and that’s what I was after.
The trick to getting it all working was replacing the Z stepper that shipped with Cupcake #235 and replacing it with a more powerful one from Lin Engineering (which required a new metric pulley from SDPSI). The Z-table is now quite zippy and does not stall like the old one did.
Photos and parts lists to be posted everything’s a scattered mess in the aftermath of Pittsburgh MiniMaker Faire, the lasersaur build, fixing my mom’s laptop, and a thousand other papercuts.
I wanted to make a sturdy-but-hollow manifold for the air assist on my lasersaur. I ended up using a trick I’ve seen in catacombs and gothic structures — internal support columns.
The STL and images are posted over on thingiverse. The short of it is:
- make a hollow object
- determine which way will be up/down when you print it
- add columns along this axis that are close enough together and to the edge that the spanning shells will hold
- print!
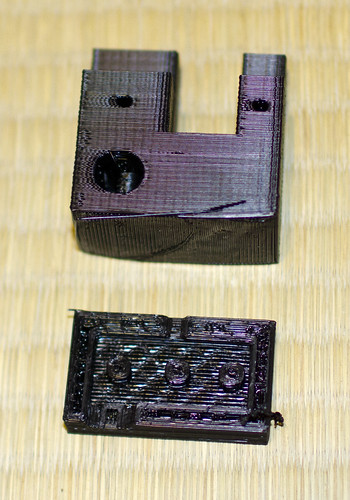
Here’s an example: The top piece is a completed print, the bottom is a partial print showing the base, rotated 90 degrees. You can see the starts of the three columns that support the rest of the print and the inlet (the big hole on the top print) and the outlet on the other side of the print:
It’s really just that simple.
A bit behind on the blogging thing these days due too much ‘real’ work, but I thought I’d show off one of my latest mini-projects. It’s a modular tool-rack for the MakerBot Cupcake, published on thingiverse as modular tool-holder rack.
I’ve been using open source software at work since the late 80s and have spent the past couple of years experimenting with Arduino, Reprap, Makerbot, and I’m getting involved with early lasersaur development.
It’s my strong opinion that over the next year open source hardware will really start making an impact in the local and small-scale fabrication space. While there are plenty of shops using EMC2 in large-scale fabrication, the learning curve is steep and EMC2 is focused on subtractive machining operations. There are no fundamental patents on things like mills or lathes to deal with, but a lot of the control circuits and interfaces used are proprietary or at least closed source.
With lasersaur using grbl, Makerbot using (and supporting) ReplicatorG, and the increase of quality tools like Inkscape and OpenSCAD I think we’re finally seeing small-scale manufacturing with a toolchain almost entirely made of open source hardware and software. (I’m not going to wade into the argument about whether or not it’s “real” open source if you’re still buying steppers or power supplies or other COTS items. :-)
In order to help move this process along, I’ve created a new mailing list, opensourcefab, and am working on a wiki/web forum as well.
My goal for this list (and for the forum that will soon go online) is to create a space for those of us who want to use these tools for serious fabrication. Maybe you make/sell model railroad components or build big skeery robots or work at an in-house shop making spares but we’re all interested in the same thing — using open source tools in a production environment.
–jet
Turns out my boards were dead, MakerBot RMA’d them and the new ones seem to be working just fine for manual controls and temp settings. Will do some test runs, get some end-stops made, and post a how to in the next week or so.
Well, that didn’t go so well. After a couple of weeks of fussing and fighting with Gen 4 electronics it appears I have a bad motherboard. Countless hours of diags down the drain because of a bad board.
Something we in the open source hardware need to adopt is the idea of standardized tests / QE. If I were at work, the first thing we’d have done was toss the mobo in the “to be re-tested” pile and grabbed a fresh one to see if we could replicate the problem.
On the up side, while researching the problems I was having, I stumbled across a great blog that every Makerbot owner should read.
My Gen 5 electronics and Stepstruder have arrived and I’m in the process of bolting them onto Makerbot Cupcake #235. I’ve got it mostly working and will document it fully once it’s done.